Accessing files on a USB drive remotely from the internet
If you connect a USB drive to a Keenetic router, you can not only share files within your home network, but also set up remote access to your USB drive from the Internet. USB drive files can be accessed from a computer as well as from a mobile device.
Imagine that you have a Keenetic router at home and a USB drive connected to it. You want to access your USB drive files from anywhere on the Internet (e.g. from a computer at work).
Remote access can be provided in several ways, depending on the IP address (public or private) and the type of connection (WebDAV, FTP, L2TP/IPsec, SSTP, OpenConnect, PPTP, IKEv2) is used on the Keenetic.
For checking if the IP address is public, see What is the difference between a public and private IP address?
The IP address for Internet connection: | private IP | public IP |
|---|---|---|
Remote access options: |
|
|
Important
To connect to the router via third-party applications, we recommend creating a separate user account, only allowing access to the desired server (e.g. to USB drives via SMB protocol, to WebDAV Server or VPN server only). For security reasons, do not use the router administrator account, specify a user account with restricted rights.
All account information (login and password) on the router is case-sensitive.
Remote access to a USB drive with a private IP address used for Internet access.
At first, connect a USB drive to the Keenetic as follows: Connecting a USB drive.
Then register a permanent domain name for the router in the KeenDNS service (use the 'Cloud access' mode). You can do this by following the KeenDNS service instruction.
Remote access to the Keenetic web interface by its KeenDNS domain name.
Use the KeenDNS registered domain name to connect to the Keenetic web interface. Once connected, go to the 'Applications' page and click on the connected disk entry.

The built-in file manager will appear, where you will see all folders on the disk.
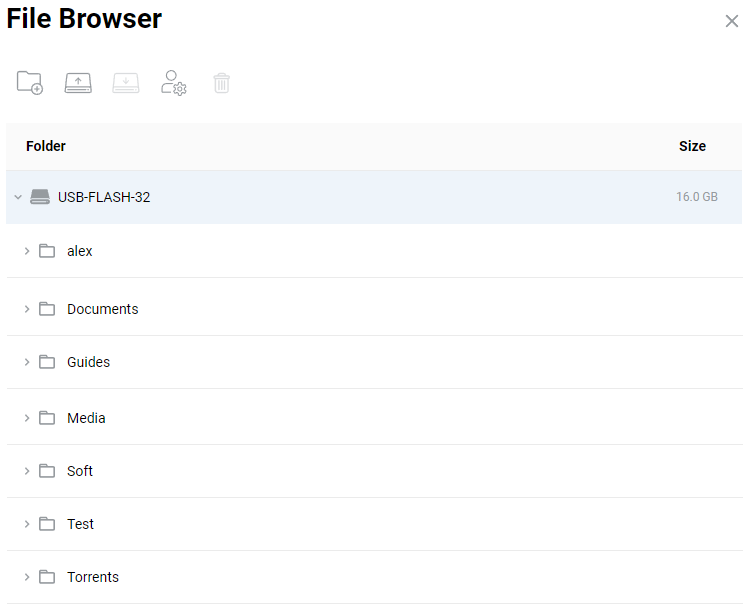
With the built-in file manager, you can:
 Create a directory inside the selection;
 Download a file to your computer;
 Upload a file to the selected directory;
 Delete a file or folder.
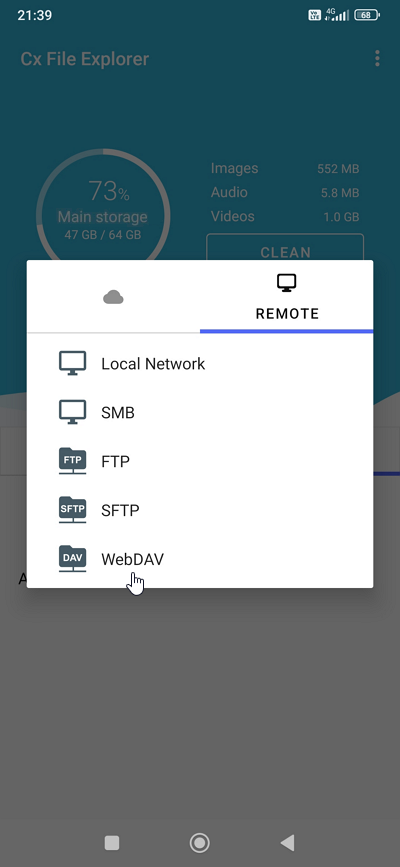
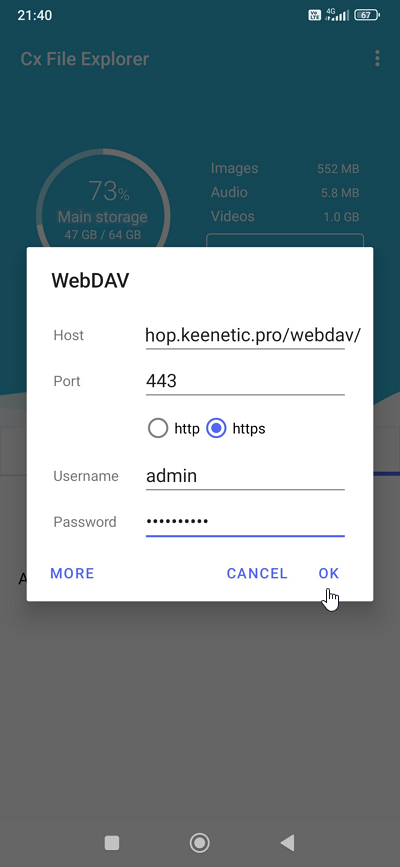
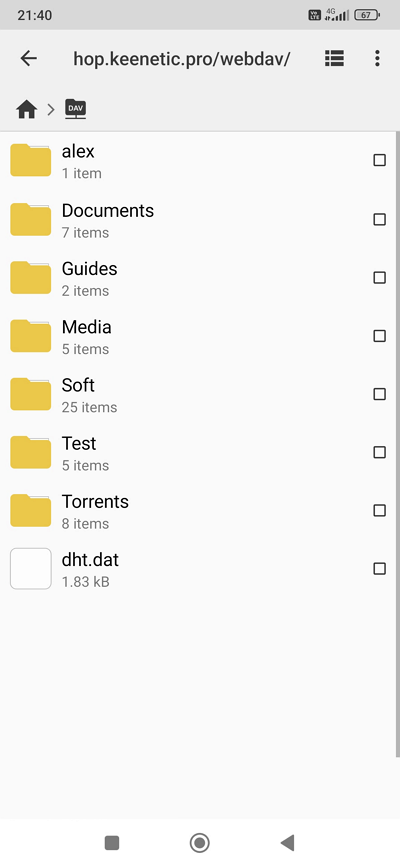
Remote access via WebDAV connection.
KeeneticOS includes support for the WebDAV protocol to work via KeenDNS — our cloud-based domain name service.
You will be able to access files and folders of your USB drive connected to your Keenetic router remotely at
https://{keendns-name}/webdav/Important
A special feature of Keenetic's WebDAV support is the ability to read and write files on the drive remotely, even if a private IP address is used for Internet access.
To remotely access files and folders on your USB drive, you need to run a web browser (or a file manager with WebDAV support) on the client device and set up a connection to your Keenetic. Using a web browser to connect, you can only browse and download files. Connecting from a file manager via the Internet to a USB drive will allow you to add, delete, copy, move files and folders just like on a local device.
For more information on the configuration and use of WebDAV, see Connecting to a USB drive with WebDAV.
To set up the WebDAV server on a Keenetic router, go to the 'Applications' menu. In the 'Private Cloud' section, turn on the 'Allow access from the Internet' option. In the 'Users' subsection, enable the 'WebDAV' option for the user you want to allow remote access and then click on 'Folder' field to specify the desired folder on the USB drive.
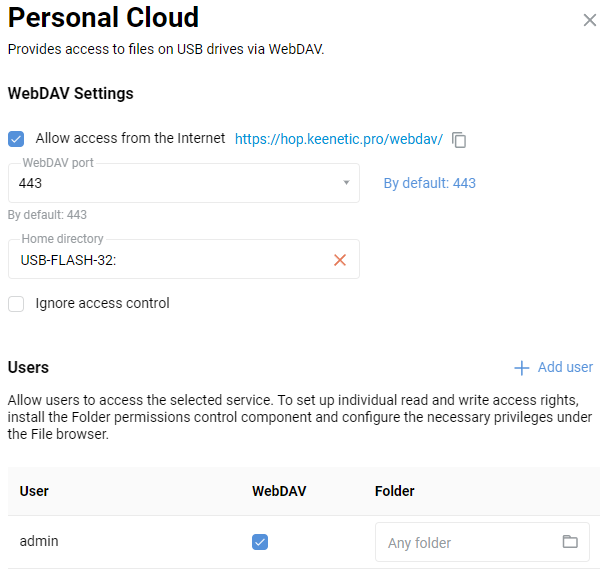
Important
Be sure to check the permissions for the parent folder. In the built-in file manager window, click on the parent folder, then on the
 button and assign 'Read-only' or 'Read & Write' access rights.
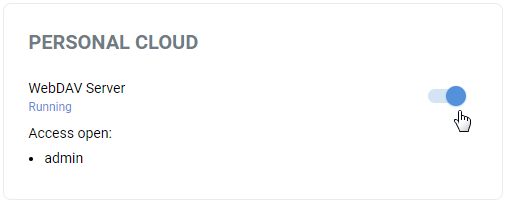
Now go back to the 'Applications' page. By default, the WebDAV server is disabled. To enable the server, move the switch to the 'Enabled' state.
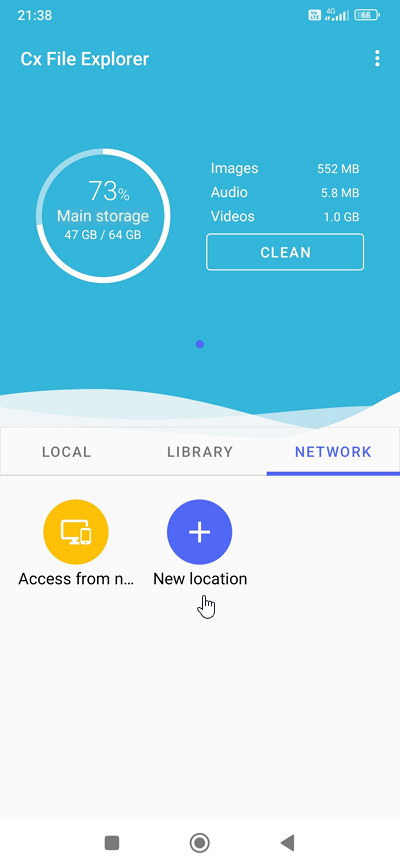
Next, you need to establish a remote connection to the WebDAV server. This can be done through a web browser or a file manager that supports the WebDAV protocol. The choice of software depends on the operating system and the type of device (mobile device or desktop PC) from which the connection will be made. We recommend using a file manager so that you can delete, move or add a file to the USB drive. If you only need access to files, use the easiest and most accessible option, your Internet browser. Examples are shown in the Connecting to a USB drive with WebDAV instructions.
For example, access via WebDAV from an Android mobile device:
Remote access via SSTP connection or OpenConnect.
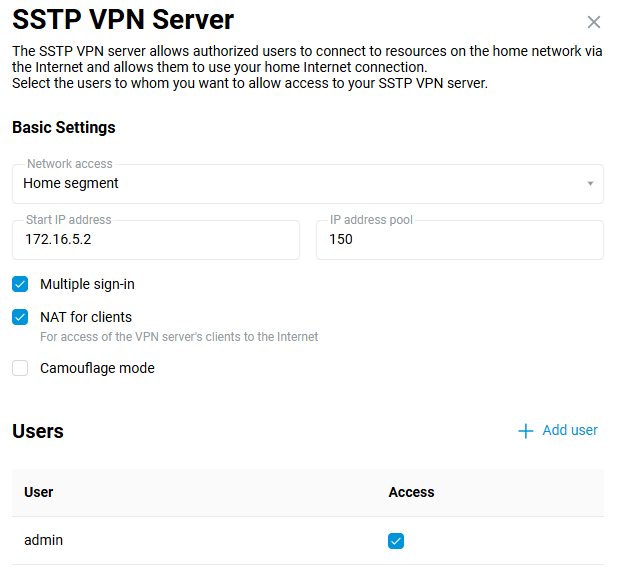
You can set up an SSTP VPN server or OpenConnect VPN server in your Keenetic router. It allows the remote connection of clients to your local network.
Important
The main advantage of the SSTP (Secure Socket Tunnel Protocol) and OpenConnect tunnels is its ability to work through the cloud, i.e. it allows you to establish a connection between the client and the server, even if there are private IP addresses on both sides. All other VPN servers require a public IP address.
We will show an example with an SSTP VPN server, but similarly you can use an OpenConnect VPN server.
Configure the SSTP server according to the instruction SSTP VPN server. For example:
Then, for remote access to the server, you need to configure the SSTP client. The SSTP client can be:
A Keenetic router — SSTP client;
A computer with Windows — SSTP connection from Windows 10;
A mobile device with Android OS — SSTP connection from Android.
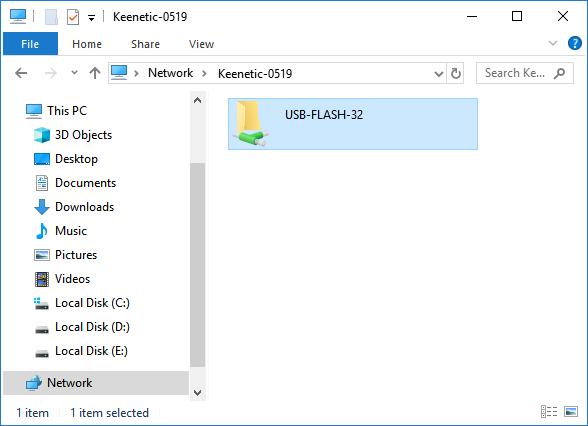
After successfully connecting to the SSTP VPN server, set up network access to a USB drive connected to the Keenetic. For example, on Windows, launch the 'Run' application or the 'Explorer'. In the address bar, enter the local IP address of the Keenetic after '
\\' symbols (in our example it is\\192.168.1.1).

If 'Anonymous Access' is turned off when you set up USB sharing on the 'Windows Network' page, you will be prompted to enter your
loginandpassword. In this case, you need to specify the account information to access your Windows home network and USB drives via SMB/CIFS protocol.For information on accessing files and folders from a mobile device, please refer to the instructions in 'Accessing USB storage files from an Android device'.
Note
By using an SSTP and OpenConnect connections, you can similarly set up remote access to a USB printer connected to the router or any other local network device — webcam, network drive, media server, etc.
Remote access to a USB drive with a public IP address used for Internet access.
The remote access options mentioned above for a private IP address are also suitable for access from a public IP address. Still, with a public address, these options are more numerous than with a private address. They consist of enabling one of the L2TP/IPsec (L2TP over IPsec), IKEv2, WebDAV, FTP, SSTP, OpenConnect or PPTP VPN servers for remote access to the local network where the USB drive is connected.
At first, connect a USB drive to the Keenetic as follows: Connecting a USB drive.
Then register a permanent domain name for the router in the KeenDNS service (if you have a public external IP address on your router, you should use the 'Direct access' mode). You can do this by following the instructions in KeenDNS service.
Remote access via L2TP/IPsec or IKEv2 connection.
We recommend you to use an L2TP/IPsec server or IKEv2 server for secure access to local network resources. These types of connections can be established from a smartphone, tablet or computer with minimal configuration: Android, iOS and Windows.
We will show an example with an L2TP/IPsec VPN server, but similarly you can use an IKEv2 VPN server.
Configure the L2TP over IPsec according to the instruction L2TP/IPsec VPN server. For example:

Then, for remote access to the server, you need to configure the L2TP/IPsec client. The L2TP/IPsec client can be:
A Keenetic router — L2TP/IPsec (L2TP over IPsec) client;
A computer with Windows 10 — Connecting to an L2TP/IPSec VPN server from Windows;
A mobile device with Android — Connecting to an L2TP/IPSec VPN server from Android;
A mobile device with iOS — Connecting to an L2TP/IPSec VPN server from iOS.
After successfully connecting to the L2TP/IPsec VPN server, set up network access to a USB drive connected to the Keenetic. For example, in Windows, launch the 'Run' application or the 'Explorer'. In the address bar, enter the local IP address of the Keenetic after '
\\' symbols (in our example, it is\\192.168.1.1).If 'Anonymous Access' is turned off when you set up USB sharing on the 'Windows Network' page, you will be prompted to enter your login and password. In this case, you need to specify the account information to access your Windows home network and USB drives via SMB/CIFS protocol.
For information on how to access files and folders from your mobile device, see the article 'Accessing USB storage files from an Android mobile device'.
Tip
For easy access to a network share, you can connect it as a network drive so that it appears as a normal logical drive in Windows Explorer or a file manager. See 'How to create a network drive in Windows to access a USB drive connected to a router' for this setting.
Note
Using a VPN connection to one of the Keenetic servers (SSTP, OpenConnect, IKEv2, L2TP/IPsec, PPTP), you can set up remote access to a USB printer or any other LAN device such as a webcam, network drive, media server, etc.